Can I create 3D renderings from my CAD drawing?
Creating 3D renders from CAD drawings is a powerful way to bring your designs to life. Whether you’re working on furniture pieces, interior elements or industrial components, 3D renders help you create realistic visualizations that can convince customers even before production begins. In this article, we answer the most frequently asked questions about creating professional 3D renders from your CAD models.
With the right knowledge and tools, you can create impressive visualizations that are not only beautiful to look at, but also provide valuable insights into the final product. From the basics of 3D rendering to practical tips for optimizing your workflow, we’ll guide you through the entire process.
What are 3D renderings and why create them from CAD drawings?
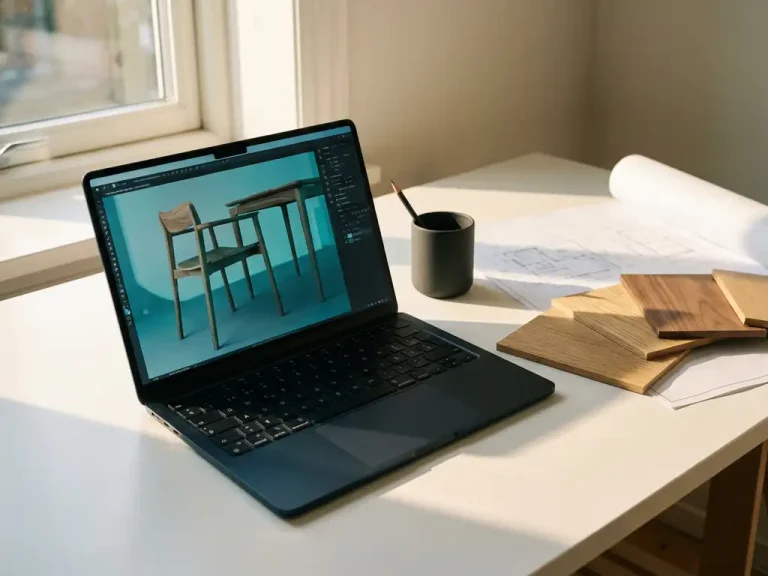
3D renders are photorealistic images generated from digital 3D models, simulating light, materials and textures to create a lifelike image. Creating 3D renders from CAD drawings allows you to visually present your designs before they are actually produced.
The benefits of 3D rendering are manifold. First, you can validate designs and identify any problems before beginning costly production. In addition, renders help communicate complex ideas to customers, suppliers and colleagues. A well-made render speaks for itself and prevents misunderstandings about the final product.
For companies in the manufacturing industry, 3D renderings are also valuable for marketing purposes. You can enrich product catalogs, websites and presentations with professional visualizations. Moreover, you can show different material variations and color schemes without having to make physical prototypes, saving time and costs.
What CAD software supports 3D rendering?
Most modern CAD software packages offer built-in rendering capabilities or integrate seamlessly with specialized rendering software. Popular CAD programs such as SolidWorks, AutoCAD, Fusion 360 and SketchUp all have their own rendering tools or support external rendering engines.
Many CAD software works in conjunction with professional rendering programs such as KeyShot, V-Ray or Blender. This combination gives you access to advanced material libraries, lighting settings and post-processing options. Choosing a specific solution depends on your budget, desired quality and the complexity of your projects.
When selecting software, it is important to consider the workflow between your CAD program and the rendering tools. Some combinations work seamlessly with direct file transfer, while others require manual conversions. The learning curve and available tutorials can also play a role in your choice.
How to create a 3D render based on your CAD model step by step?
Creating a 3D render begins with preparing your CAD model, followed by setting materials, lighting and camera settings before generating the final render. Proper preparation is essential for quality results.
Start by checking your CAD model for completeness and accuracy. Make sure all surfaces are closed and no parts are missing. Next, export your model to the appropriate file format for your rendering software, usually .obj, .fbx or .3ds.
The following steps are crucial for a professional render:
- Import the model into your rendering software and check the scale and orientation.
- Assign realistic materials to the various parts of your model.
- Set the exposure with a combination of natural and artificial light.
- Position the camera for the best viewing angle of your product.
- Configure the render settings for the desired quality and resolution.
- Run the render and check the result; adjust as necessary.
What factors affect the quality of your 3D render?
The quality of your 3D render is primarily determined by the accuracy of the original CAD model, the realism of the materials used, the quality of the lighting and the render settings chosen. Each of these elements contributes to the final visual result.
The CAD model is the basis of any good render. Make sure that all details are present that should be visible in the final visualization. Too little detail results in a flat, unrealistic render, while too much unnecessary detail can unnecessarily increase render time.
Materials and textures play a crucial role in realism. Use high-quality texture maps and set material properties such as reflectance, roughness and transparency correctly. Lighting determines the mood and realism of your render. Experiment with different light sources and shadow settings to achieve the desired look.
Technical render settings such as sample rates, anti-aliasing and resolution affect both quality and render time. Higher settings give better results but require more processing power and time. Find the right balance for your specific application.
What are the costs and time investment for creating 3D renders?
The cost of creating 3D renderings varies widely, depending on the software you choose, the complexity of your models, and whether you outsource the work or do it in-house. For software, you can expect monthly subscriptions from €50 to €500, depending on functionality.
The time investment depends on your experience and desired quality. A simple product render can be created within hours, while complex scenes with multiple objects and advanced lighting can take days. The learning curve for rendering software is usually several weeks to months, depending on your technical background.
If you outsource the work, the cost per render ranges from €100 to €1000 or more, depending on the complexity and desired quality. Many companies choose to develop basic rendering skills in-house and outsource only complex projects. This provides the best balance between cost, control and flexibility.
How IronCAD helps with 3D rendering
IronCAD provides an ideal basis for creating high-quality 3D renderings thanks to its advanced modeling capabilities and seamless integration with professional rendering software. With our solution you can:
- Create detailed 3D models directly suitable for rendering.
- Utilize the extensive material library for realistic visualizations.
- Take advantage of drag-and-drop functionality for quick design iterations.
- Export to all common rendering formats without loss of quality.
- Save time thanks to the intuitive interface and efficient workflow.
Whether you work on furniture designs, interior elements or industrial components, IronCAD gives you the tools to create professional 3D renderings that impress your clients. Want to discover how IronCAD can improve your rendering workflow? Contact us for a personal demonstration.